A Step By Step Guide On How To Use Green Screen In Capcut
Capcut, an amazing video editing app, has introduced a range of editing technologies and features including splitting, cropping, speed adjustment, adding stickers, filters, effects, templates, and more. One of those features is the ability to add a green screen or the use of the chroma key.
We are walking through the most modern and digital era where everyone is connected to social media and uploading daily life routines and adventures on it. In this context, the use of a green screen has become an essential aspect of editing. Whether it is a life adventure, a trendy meme, captivating banners, or something else, It helps to enhance our content with creative visuals and dynamic backdrops.
In this blog, we will discuss in detail how to use a green screen on Capcut and remove its background. Let’s take a closer look at how it actually works.
How To Do Green Screen On CapCut Using Chroma Key
The Chroma key is an efficient feature in Capcut for removing the video background. You can use this feature to make your videos classical and professional and to give them a stunning look by layering green screen clips.
Here is a complete tutorial for this.
Download And Install The Capcut App
First of all, install the Capcut video editor from the Play Store or the App Store, if you have not installed it yet. The installation process is quite easy. You just have to visit your respective app store. If you want to get Capcut apk latest version with all premium features unlocked for free, just click the button below right away.
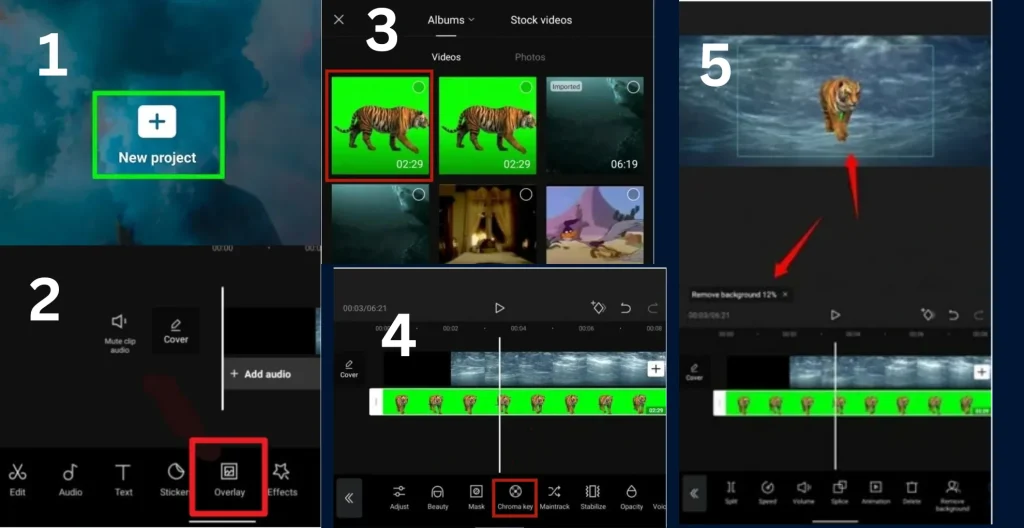
Once the installation process is done, open the app, set up your account, and click on ‘Create A New Project’.
Upload Your Desired Background Video Or Picture
After creating a new project, select a video or picture that you want to use as a base video. You can choose multiple clips as well. Select them from your device storage and then click on “Add”.
Import The Green Screen Clip As An Overlay
Once the base video selection is done, tap on the “Overlay” button at the bottom of the screen. From this option, you can layer another video or the picture on the existing one. Now select the green screen video from your device gallery by clicking the “Overlay” button.
Apply The Chroma Key Effect
After importing the green screen clip, first drag it to adjust its size, rotation, and desired location. When its location is all set, select this clip on the timeline and click on the “Chroma key” tool at the bottom. By clicking the chroma key, the color picker will pop up. Here you can select the green color or any other that you want to remove from the video.
Refine The Composite
Tap on the “Intensity” and a slider will appear at the bottom. Drag and drop the slider to adjust the intensity and remove the color efficiently. You can use “Shadow” to adjust the lighting as well. Cropping, masking, or animation tools can be used to refine the composite further.
Save And Export Your Project
When all of the adjustment is done, save your project by the clicking check mark at the bottom. Now play it to preview the project. If you are satisfied, export it to your phone’s gallery.
How To Use Green Screen In Capcut With Background Remover
Background Remover is another feature of Capcut to remove the green screen or the video background. There is nothing much to do with it, you just need to tap on this tool and it will remove the green screen background automatically.
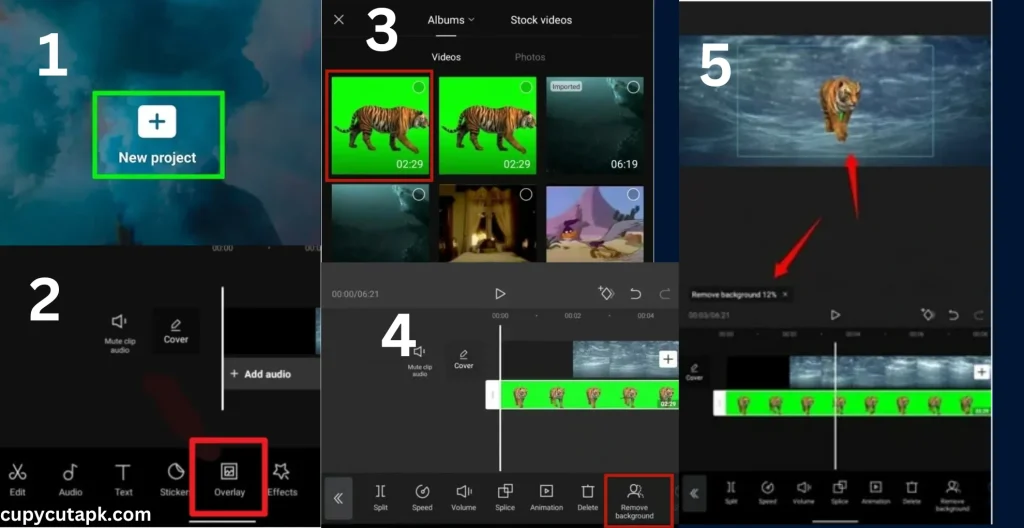
Here is a step-by-step guide on how to remove the green screen on Capcut with background remover.
Create A New Project
To get started, open the app on your device if it is already installed. If you do not have the Capcut app on your device, go to your respective app store and install it immediately. After installation, open the app and click on “New Project”.
Import The Green Screen Video
After starting a new project, first of all, add a base video that you want to use as a background. Then click on the “Overlay” to import the green screen video from your phone’s gallery as an overlay.
Apply The Remove Background Effect
Now select the green screen video on the timeline and click on the “Remove Background” tool at the bottom. The video will be processed automatically to detect and eliminate the green screen.
Adjust the settings like “Saturation” and “Spill Suppression” to achieve the maximum natural results and seamless appearance. Position your object on the background you added as well.
Export Your Project
To make your video more stunning and captivating, you can add additional effects and transitions as well. When you are all done, play your video to preview it. Now if you are satisfied, export the video to your device storage.
Final Thoughts
This blog is about how to edit the green screen on Capcut. We have explained this in two different ways. You can choose the one that fits you well. If you want to know more about Capcut tutorials like how to blur videos on Capcut and much more, just keep visiting our website.

